
AlphaPixel often gets called upon to work on legacy codebases, sometimes VERY legacy. We have contact with code from the 80s and 90s on a regular basis, in a variety of dialects and languages, and stored and archived in various difficult containers and mediums.
While NDAs and confidentiality mean we often can’t talk about our paid projects, we recently had an interesting side project that used the same processes, only it was all for fun, so we can talk all about it.
The task: Revive the Amiga source code for a basic educational raytracer written by our friend and early mentor, Brian Wagner.
In Part 1 of this blog series, we located the legacy source code online and assembled a set of tools to bring the code into a modern environment intact. In Part 2, we updated the code and got it running with exactly the same abilities it originally had, using a modern compiler and operating system. In Part 3 we restored the original windowed preview GUI (and made it better!). In Part 4 we added an SDL event pump and a basic Unit Test.
Now, in Part 5 we’re going to clean up the code a bit and then see what other improvements we can easily make.
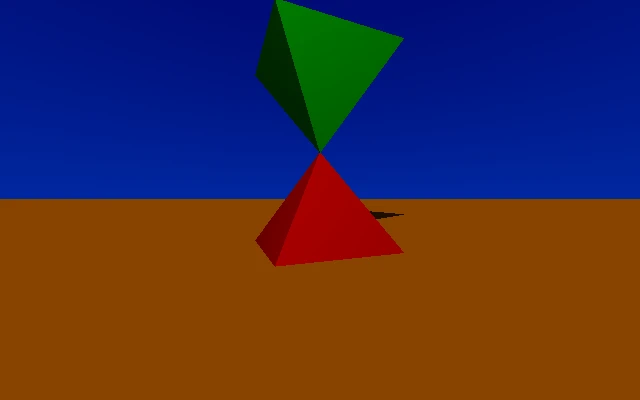
We’re starting with the code from the end of Part 4, which can now render 1k, 2k or even 4k output:

We never dreamed of 4k displays in 1993.
How did we get the code running so quickly in the beginning?
To get the code running quickly with minimal changes spread throughout the codebase, I created proxy functions (platformstub.*) that stand in for the Amiga file and memory APIs. It’s time to remove those proxies and put the portable C APIs in their place, which will allow us to retire the platformstub code.
I’ll do this by simply searching for each Amiga API (AllocMem/FreeMem/Open/Close/Write) and copying the implementation from platformstub.c inline instead.
So,
polys[npoly].vtx = AllocMem(cnt * 2, MEMF_CLEAR);
And
void *AllocMem(ULONG byteSize, ULONG attributes)
{
    if(attributes & MEMF_CLEAR)
    { // request clearing of allocated memory
        return(calloc(1, byteSize));
    }
    else
    {
        return(malloc(byteSize));
    }
}
Becomes simply
polys[npoly].vtx = calloc(1, cnt * 2);
And likewise with the Open/Close/Write function calls.
Next we’ll eliminate the platformstub sources file.
Then we’ll substitute the archaic idiom of using LONG * instead of FILE * for file pointers, which has been causing typecasting warnings all along.
How is Unit Testing helping us in forward porting?
Fortunately, due to our unit testing, it’s trivial to see immediately if we break something at runtime – which we haven’t. Everything is going smoothly, and I’m making commits after each step so blame can be pointed in the future if something does regress.
At this point all of my build warning are gone, except for a weird one:
[build]\AmigaWorld-Raytracer-Brian-Wagner\load.c(170): warning C4047: '=': 'SHORT *' differs in levels of indirection from 'int'
Why does the compiler think calloc returns int?
What’s weird is that calloc() returns void *, but the compiler SEEMS to think it is returning int. It doesn’t. Ahh, it’s because we haven’t included <stdlib.h> so the compiler thinks calloc returns int (by default) and the linker sorts it out quietly. Easy fix to just include <stdlib.h>.
Now let’s refactor and simplify the init/cleanup code because it’s cumbersome and repetitive.
First, we don’t need size1, size2, and size3 because the C standard library malloc/calloc/free system remembers the size of the allocation for us. So we’ll fold the size computation right into the allocation and discard the stored size variables.
Before:
size1 = sizeof(struct Polygon) * MAXPOLYS;
polys = calloc(1, size1);
After
polys = calloc(MAXPOLYS, sizeof(struct Polygon));
And the same for size2 and size3.
Now we’re going to clean out the legacy types: VOID, UBYTE, CHAR, [U]SHORT, [U]LONG, FLOAT and DOUBLE, and macros TRUE, FALSE and NULL. We’ll replace them with portable types and eliminate types.h
That done, things still compile and run neatly with no regressions. This is grind work, we WILL get to something fun soon – skip ahead if you’re bored.
Changing 16-bit to 32-bit integers
For memory frugality and performance on the original Amiga code, the author originally chose to make a number of datatypes short (16-bit). While the CPU then could possibly do 16-bit short math slightly faster than 32 (just because of memory bandwidth alone), it’s not longer really applicable here, and it makes things cumbersome. I’m going to globally rewrite all short types to plain int. Under the LLP64 datatypes model commonly used today, LONG types will be 64-bit but plain int is still 32.
This requires fixing up fscanf and other string-numeric type conversion functions that use format strings (like %hd), which I have also done. This would be a good time to build and run and test because we’ve made subtle yet substantial changes.
Hey, we crashed the program on exit! Let’s investigate. We’re overrunning the length of the vtx member of the polys array in freevtxarrays()! Probably something was using a hardcoded size of 2 (for a short) and didn’t like when we went up to long (4 bytes). Let’s look for where the vtx member is allocated. It’s in load.c, loadobject() and sure enough, it does:
polys[npoly].vtx = calloc(1, cnt * 2);
That ‘2’ there was for the size of a ‘short’, and it should be “sizeof(long)”. Really we probably ought to declare a Vertex typedef so we could do sizeof(Vertex). We might do that later, but right now there’s no good place to put that typedef so let’s just go with sizeof(long). I did a search and couldn’t find any other misguided “* 2” calculations, so we are probably good. Rebuilding and testing confirms we run ok again. Yay for running unit tests after every change!
What is a good way to structure init and cleanup code in C?
So the next big thing to do would be to restructure the init/cleanup code in tracer.c. Currently it has a series of steps where a resource is acquired/initialized in a way that could fail. After each step, it checks to see if the most recent step fails, and if it did, it unwinds all of the steps up to that point, prints an error message, and exits. This leads to LOTS of repetition of the cleanup code – if you add a new step, there are multiple places the cleanup must be inserted. Clearly a violation of the DRY – Don’t Repeat Yourself principle of coding.
It may have just not really been something the original author was experienced with – I know I probably wasn’t aware of it at the time. Sometime after this period as I grew as a C programmer I became enamoured of a style involving cascading nested if/else statements, where each if attempted to acquire/init a resource and checked if it succeeded. If it did succeed, it would dive deeper into the next if. In the event of failure, the program flow would skip the nested if and proceed to the cleanup as it unwound the nest of if()s. C++ obviously introduces objects, constructors and destructors that help automatically manage this.
The disadvantage to the nested style is that that this can become deeply nested for a large number of stages, and early programming platforms had limited screen real-estate. This is not so much a problem now, so let’s adopt this practice to reduce error-prone repetition and shrink the code. We also can pre-initialize all pointers to dynamically-allocated memory to NULL, because free() actually tolerates a NULL pointer argument benignly, allowing us to reduce the number of if()s that check a pointer to see if it needs to be freed. The variables this impacts are: polys, verts, red, grn and blu.
Let’s take a 40,000 foot overview of what this looks like, with before on the left and after on the right.
This elimination of repetition allows us to take tracer.c from 280 lines to only 200, and prevent a lot of potential dumb mistakes in cleanup code.
Ok, that’s a lot of drudge work without much reward the program literally works exactly the same as when we started. This is the problem with what’s called “technical debt”. When you have code that is years old and hasn’t been maintained, it takes a lot of work to bring it up to the expected quality (called “paying down” the technical debt). This can be an expensive process that is very hard to sell stakeholders on, because when it’s done, they can’t see ANY functional difference between what they had when they started and what they have at the end. Nonetheless, paying down technical debt is a critical part of modernization. Now that we’re ready to start actually improving things, we need the tech-debt improvements we’ve already made, otherwise new features will be even more costly to make and less likely to be successful.
Real-world development on an old codebase usually has to be a mix of actual improvements and paying down technical debt. Frequently, addressing tech debt will make it EASIER to make new improvements, but stakeholders and clients want to see rewards as soon as possible. So it’s common to schedule some of the most critical technical-debt servicing early on, and then interleave actual capability improvements with ongoing tech debt work.
In that light, we will come back later and do some more code beautification and rewrite the Kernighan and Ritchie style function prototypes into ANSI style, but first we’re going to stop with the technical debt for a bit and get a bit of Dopamine by actually improving the program with new features. We want to make something that’s relatively simple but also effective and interesting. I’ve decided that this next improvement will be: ANIMATION!
Can you believe that in 2024, Disney’s Steamboat Willie has entered the public domain and we can use it legally?
An animated raytracer in C
Animation could mean a LOT of things, but at this stage, all we’re going to animate is the camera pose (stored in the pyrsopts file). We will do so by loading TWO options files (supplied on the command line), and linearly interpolating between them across a number of frames (also specified on the command line). Linear interpolation in time is very simple, and we’ll assume 60 frames per second for simplicity.
To make this work, we’ll need THREE ViewOpts structures, one representing the start configuration, one for the end and one for the current. The raytracer will continue to use the existing ‘vopts’ structure, which used to be the one and only. However, now the variable named ‘vopts’ will represent the ‘current frame’ ViewOpts, and we will update it on each frame by blending from the start and end ViewOpts structures. So, we need to change loadvopts to load into a specified target ViewOpts that is passed by pointer as an argument.
err = loadvopts(argv[2], &vopts_start); // start vopts
err += loadvopts(argv[3], &vopts_end); // end vopts
One other gotcha is that the original code actually transforms the one and only copy of the loaded vertices of the scene! So, we’ll need to adjust things to have a pristine copy of the vertices (cleanverts), AND a working copy (verts) that gets refreshed from the pristine copy, and then transformed on each frame.
if(err = loadobject(argv[1], cleanverts)) // err is non-zero for failure
…
// refresh clean copy of verts from cleanverts
memcpy(verts, cleanverts, (MAXVERTS * sizeof(struct Vertex)));
…
transform();
Now all we need to do is compute how far through the start-to-end animation period we are, and interpolate between the start and end vopts values by that same amount. Here’s some code:
void interpolatevopts(struct ViewOpts *dest, struct ViewOpts *start, struct ViewOpts *end, float stepfraction)
{
/*
// not all params make sense to interpolate, so we'll only do what makes sense
// [camera] cax, cay, caz, [lookposition] lpx, lpy, lpz, [lightsource] lsx, lsy, lsz, [groundpos] wdy, [center of projection] cpd
*/
// CAmera position
dest->cax = start->cax + ((end->cax - start->cax) * stepfraction);
dest->cay = start->cay + ((end->cay - start->cay) * stepfraction);
dest->caz = start->caz + ((end->caz - start->caz) * stepfraction);

// Look Position
dest->lpx = start->lpx + ((end->lpx - start->lpx) * stepfraction);
dest->lpy = start->lpy + ((end->lpy - start->lpy) * stepfraction);
dest->lpz = start->lpz + ((end->lpz - start->lpz) * stepfraction);

// Light Source
dest->lsx = start->lsx + ((end->lsx - start->lsx) * stepfraction);
dest->lsy = start->lsy + ((end->lsy - start->lsy) * stepfraction);
dest->lsz = start->lsz + ((end->lsz - start->lsz) * stepfraction);

// WorlD
dest->wdy = start->wdy + ((end->wdy - start->wdy) * stepfraction);

// Center of Projection
dest->cpd = start->cpd + ((end->cpd - start->cpd) * stepfraction);
}
And in tracer.c’s main:

// compute how much from start to end should we step on each frame increment
timestepfrac = 1.0f / numframes;
…
interpolatevopts(&vopts, &vopts_start, &vopts_end, currenttimestep);
…
// save frames during animation
if(numframes > 1)
{
char framefilename[255]; // poor practice making this fixed size…
sprintf(framefilename, "%s%05d", argv[1], currentframe);
saveImageToFile(framefilename);
}

currenttimestep += timestepfrac;
Now, each time we generate a frame it’s at a slightly new pose, and we add the frame number to the filename when saving.
There are a variety of tools for assembling frames into an animation, for this simple exercise I used https://ezgif.com/ to produce a WebP video:
An animated raytracer in C!
To clarify my comment in the interpolatevopts() function, some of the settings don’t make any sense to interpolate (like frame pixel size) so we only interpolate the following:
[camera] cax, cay, caz
[lookposition] lpx, lpy, lpz
[lightsource] lsx, lsy, lsz
[groundpos] wdy
[center of projection] cpd
You are free to experiment with these, but be advised, some weirdness does seem to happen if you view the scene from the back side of the pyramids. We may explore that in the future.
I’m going to make one more feature enhancement. I’m going to add a procedural texture. Where shall I add it? Why the ground of course! And what should it be? Why, a checkerboard of course!
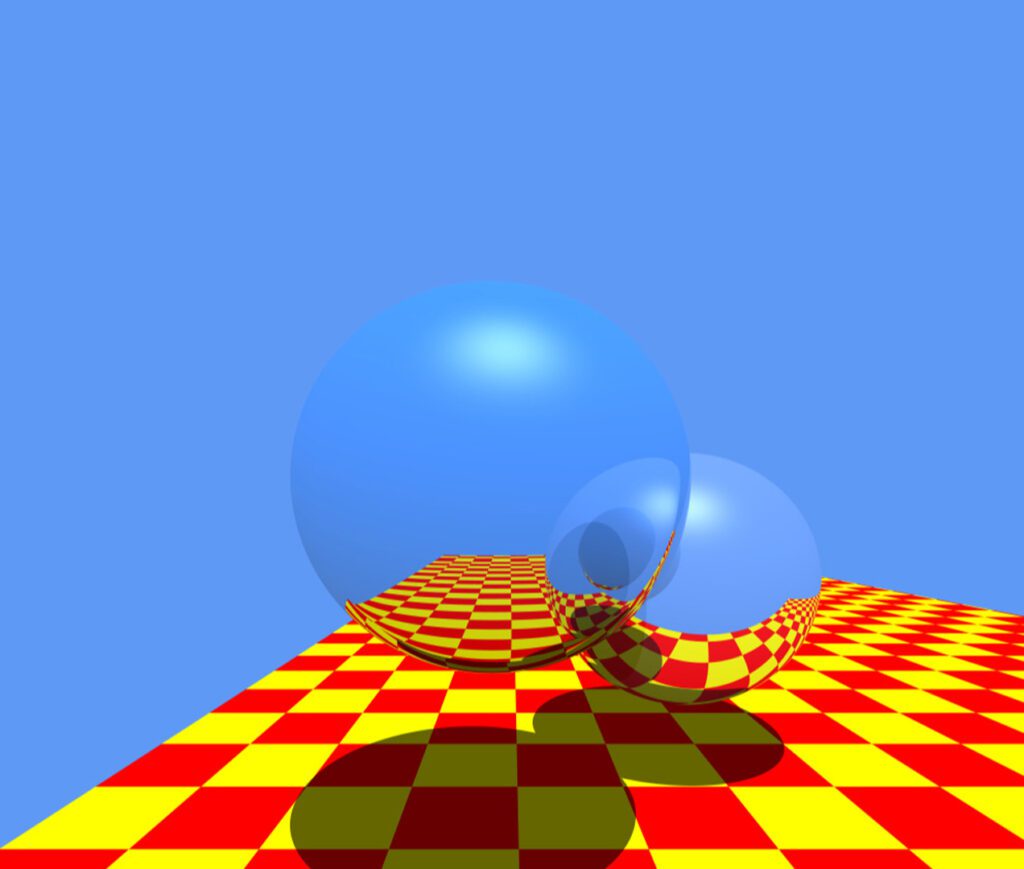
Why do raytracers always use checkerboard ground textures?
Well, as far as I can tell, this trend goes all the way back to J. Turner Whitted’s June 1980 seminal ray tracing paper “An Improved Illumination Model for Shaded Display”.
From https://history.siggraph.org/artwork/turner-whitted-the-compleat-angler/
Copyright 1980, John “Turner” Whitted
So why did Turner Whitted (as he apparently prefers to be known as) use a checkerboard texture? The regular, repeating, straight lines and the alternating squares of color make an excellent test pattern to show the behavior ofd the ray reflection and refraction of the spheres. See, Whitted was trying to show off the curved distortion of the glass sphere and the spherical reflection of the chrome sphere, and a solid-colored ground would just show – solid. Whitted actually credits earlier work by Martin Newell and Frank Crow for inspiring the checkerboard. Without the checkerboard you wouldn’t have any landmarks to be able to see the effect of the curvature. Adding the alternating check pattern shows the transformation perfectly. (Whitted was actually showing off RECURSIVE ray tracing, something that our little demo doesn’t REALLY have yet, excepting some crude shadows).
Similarly, in the famous 1986 Amiga Juggler demo, made by a predecessor of the Amiga’s Sculpt3D raytracer, Eric Graham used a yellow and green checkerboard pattern for the same reason.
We’ll use the Whitted color scheme for our checkerboard as a sign of respect. Whitted seems to have probably used RGB(255,255,0) for yellow and RGB(255,0,0) for red. The Juggler scene has also been recovered (search for rttiles) and appears to define the yellow and green at 150% Red+Green and 150% Green respectively. It’s not clear to me why they’re greater than 1.0 aka 100%, but if you prefer Juggler style, use RGB(0,255,0) for the secondary color.
Before we can actually implement our checkerboard pattern, there’s another hidden gotcha we need to resolve. The shadow code doesn’t actually darken (or fail to lighten) the nominal brown ground color RGB (136,68,0). It actually just has a pre-darkened constant RGB(27,14,0) darker brown that it replaces the brown ground color with. So any change of the solid ground color will need to change the shaded color as well. That’s cumbersome. To get the shaded Red component of 27 from the unshaded Red 136, we need to multiply by 0.1985294117647059. To get the shaded Green we need to multiple by 0.2058823529411765. Well that’s kind of annoying, because it would be nice to use the SAME shading factor to compute both Red and Green (and Blue, but it’s 0 turning into 0 so literally any factor would work).
I’d like my shading improvement to still produce the exact same output under the original input conditions to keep our Unit Test valid. Let’s see if we can make this work somehow.
I could split the difference and call the shading factor 0.2, since 136 * 0.2 would give us 27.2 (nicely truncates to the 27 we want). However 68 * 0.2 = 13.6 which will truncate to 13 instead of 14. But maybe we can nudge it a little and make it work. Let’s try the 0.206 suggested by the Green calculation above. 68 * 0.206 = 14.008, which will truncate to 14. BUT, 136 * 0.206 = 28.016, which is now too high, and will truncate to 28 instead of 27. Even extending 0.206 out to the full decimal representation of 0.2058823529411765, when multiplied times 136 gives us … 28 EXACTLY.
It almost seems like the scaling factor was SUPPOSED to be 0.2058823529411765, but there was a math error somewhere and the scaled red component ended up being coded as 27 instead of 28. Ok, we’ll cope with it. We’ll just use two different factors for Red and Green shadow scaling, and we’ll adopt one of the two for blue as well. In this way, the un-checkerboard rendering SHOULD still exactly match the original hard-coded shadow values, and we’ll have a shadow darkening formula that can darken any original surface color(s).
GroundR = 136;
GroundG = 68;
GroundB = 0;

ShadeR = 0.1985294117647059;
ShadeG = ShadeB = 0.2058823529411765;

…

if (groundhit(&ray, &isec)) {
if (shadowchk(&isec)) {
color.r = GroundR * ShadeR;
color.g = GroundG * ShadeG;
color.b = GroundB * ShadeB;
}
else {
color.r = GroundR;
color.g = GroundG;
color.b = GroundB;
}
This seems to successfully pass the ctest validation (which I have now updated for the new dual-vopts command-line syntax).
We can verify the shading formula works on other ground colors by setting an unshaded ground color of RGB(255,0,0) and rendering, and sampling the shadow area to show it came out RGB(50,0,0). 255 * 0.1985294117647059 = 50.625, which truncates to 50. Perfect!
NOW, we can finally set up a checkerboard ground texture.
This texture will have a pattern in XZ ground plane – if you recall in this raytracer Y is up. And the scale of things in our world is pretty big, most of the objects have coordinates in the range of 750 to a couple thousand. So, to be seen, our checkerboard pattern needs to be something like 1000 units on a side. We will use the fmod() function to modulo the incoming coordinates into repeating domains of 2000 pixels and then see if the resulting remainder is less than or greater than 1000. This will give us a repeating pattern that is 2000 pixels across and consists of one check-square of each of the two colors.
The code should look something like this:
int xTrue = (abs(fmod(isec.ix, 2000.0)) > 1000.0);
int zTrue = (abs(fmod(isec.iz, 2000.0)) > 1000.0);

if(xTrue ^ zTrue)
{
// Whitted Yellow
GroundR = WhittedGroundA_R;
GroundG = WhittedGroundA_G;
GroundB = WhittedGroundA_B;
}
else
{
// Whitted Red
GroundR = WhittedGroundB_R;
GroundG = WhittedGroundB_G;
GroundB = WhittedGroundB_B;
}
if (shadowchk(&isec)) {
color.r = GroundR * ShadeR;
color.g = GroundG * ShadeG;
color.b = GroundB * ShadeB;
}
else {
color.r = GroundR;
color.g = GroundG;
color.b = GroundB;
}
That could be more compact with some elimination of the use of the Ground* variables as temporaries, but I prefer clarity to brevity here. Here’s how it renders.
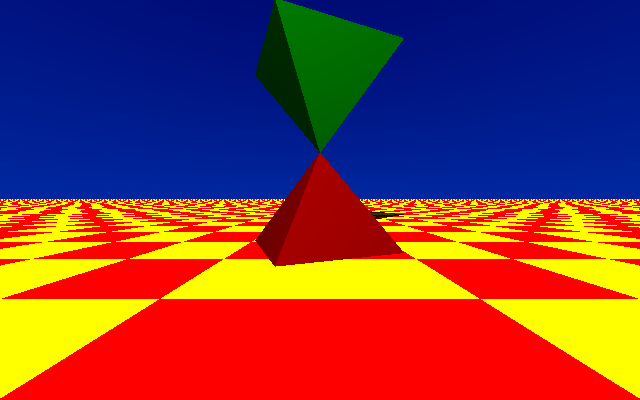
Ooooh, so Whitted!
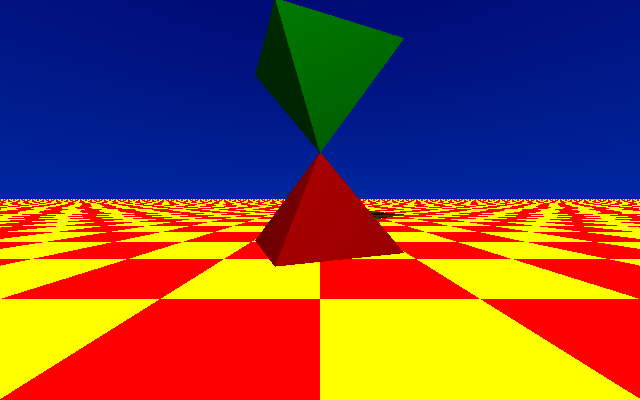
But it reveals another issue. As my friend Ernie Wright mentions in his Javascript Juggler Raytracer article, Eric Graham’s original gingham() function that makes the checkerboard has a “glitch”. At the origin of each axes, a same-colored tile is mirrored across the axis (because modulo always chops in the direction of the origin), resulting in a DOUBLE-wide checker square. You can see this front and center in our rendering. There are ways to rewrite this code to work properly, but there’s another easy way to solve it: move the coordinate origin out of sight. I’ll add 1,000,000 to the X and Z to move the artifact way off where we can’t see it for the moment.
int xTrue = (abs(fmod(isec.ix + 1000000, 2000.0)) > 1000.0);
int zTrue = (abs(fmod(isec.iz + 1000000, 2000.0)) > 1000.0);
Boom. Out of sight, out of mind!
Let’s zoom in on that shadowed area and see if our shader is shading the checkerboard correctly.
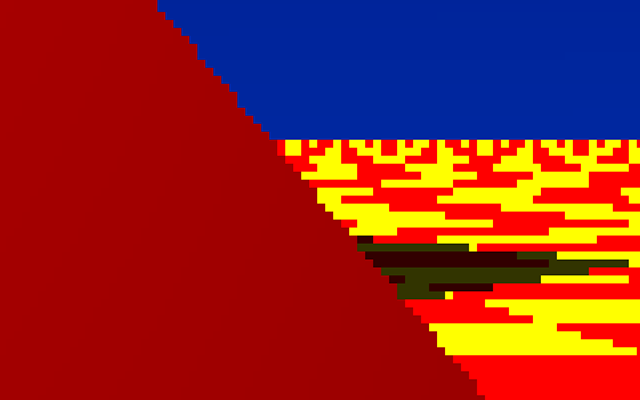
As Snoop Dogg says, yes, yes, yesssssss!
Now, I don’t want my original ctest case failing because it freaks out on this new checkerboard effect, so we need a way to trigger this functionality such that the original test scene doesn’t switch it on. I don’t want to change any file readers to add more data in the vopts or the objects file. BUT, we aren’t really using the scl field in the vopts (the fraction of the screen to render for performance reasons). I can make it do double duty, by overloading the meaning of a NEGATIVE scl value. If we see a negative scl value in the vopts, we’ll turn on the gingham pattern and set scl to its positive equivalent so everything still behaves as normal. Ugly, but it’s just a quick hack to demonstrate the procedural “gingham” checkerboard until we have a more comprehensive way to handle diverse materials in the scene.
// sneaky way to trigger gingham checkerboard
if(vopts.scl < 0)
{
Gingham = 1;
vopts.scl = -vopts.scl;
}
You can use the new pyrsopts_gingham file to test this.
This is Git hash 41296baa2ba6690a952debcedd104d76cf45cb5a.
I was going to end there, but after sleeping on the matter, the moire pattern in the distance really bothers me aesthetically. Proper methods for fixing it would involved either supersampling of the texture or the whole rendering (multisample ray tracing, possibly adaptively [p346]), or maybe using a smoothstep type function for the checkerboard basis that can be frequency-limited as the texel-size gets bigger in the distance. Frank Crow had an early paper discussing this. Supersampling the whole render is a lot more infrastructure right now, and a smarter, sample-size-aware texture basis function is also out of reach. So, we can try to simply sweep the problem under the rug for the moment by blending out the checkerboard to an intermediate solid color as the ground gets further away. I’ve chosen some arbitrary values for our 640×400 render size. Beyond 4000 units in the Z axis (negative Z is into the screen) we will start blending to RGB(255,128,0), which is an orange average of the red and yellow Whitted colors. This blend will fully replace the checkerboard over the next 18,000 units of Z distance.

That is much less harsh on the eyes. There is still jagged aliasing on the remaining square edges in the middle distance, but to fix that we need a proper solution as discussed above. This solution is unaware of resolution and the Nyquist limit as it interacts with the resolution, so it gets excessive at higher resolutions like 2k.
As a final touch, I added a fix to allow the negative scl valu to trigger the gingham checkerboard in animated scenes. Hash eb9d4c124add26f76e658d16ab3864638152a008.
We’re going to stop there for today. There’s a lot more we could do – there’s actually another gotcha that isn’t visible in this still image. The texture is “anchored” in CAMERA coordinate space – the axes of the grid are aligned and perpendicular to the camera’s X and Z axes. If we move the camera around, the checkerboard will move with it! Creepy!

To solve this we would need to refer to an UNTRANSFORMED copy of the polygons’ vertices, to look up each ray intersections’ place in WORLD coordinates (before being transformed into CAMERA coordinates). This isn’t hard, but it’s a bridge too far for this blog post. Until next time, trace safely!
AlphaPixel solves difficult problems every day for clients around the world. In the past we’ve done extraordinary things, like recovering deleted forensic video evidence from SD cards, having old failed hard drives refurbished to rescue critical data, reverse-engineering proprietary data formats to liberate valuable siloed information, even desoldering surface mount chips and sucking their brains out with hardware exploitation devices. We’ve worked on common and exotic architectures and operating systems and environments from the 8-bit to the 64-bit, Motorola, Intel, ARM, RISC-V, PA-RISC, DEC Alpha, Power, and microcontrollers.
The path to rescuing old code and data and making it useful again is a journey, often akin to building a rope suspension bridge one plank at a time, while suspended in mid-air. Sometimes while being attacked by natives, a la Indiana Jones. Often there are interlocking chicken and egg problems, where the obvious solution won’t work because of one minor issue, which then cascades and snowballs into bigger problems. It’s not ucommon to find a bug or omission in some old tool you need to use, and when you go to fix it, you find the tool can no longer be compiled by modern toolchains, necessitating reconstruction of a side environment just to fix the problem that’s blocking you on the main endeavor. We’ve jokingly used the term “Software Archaeologist” in some contexts like these.
If you have a difficult problem you’re facing and you’re not confident about solving it yourself, give us a call. We Solve Your Difficult Problems.
