PixelSense LS Tutorial
Installing
When you unzip the zipfile, you will have a file called PixelSense.exe, approximately 424K in size. There is no installation, support files, DLLs, registry entries or other cruft necessary. Place the PixelSense.exe file anywhere on your system that is convenient for you. To run PixelSense LS, simply double-click the EXE. If you would like to add PixelSense LS to your Start Menu, right click on PixelSense.exe and select the Create ShortCut item from the popup menu. When the shortcut icon appears in the same directory as the PixelSense.exe, drag the shortcut onto the Windows Start Menu (or QuickLaunch bar, or other locations in newer versions of Windows).
Preparing Input
PixelSense LS is designed to process Landsat images such as those downloaded from the University of Maryland Global Land Cover Facility (GLCF) Web Site. These images arrive in the form of multiple files, named in a particular way. For one complete 30m resolution natural color scene, you will need files similar to these:
 If you wish to alter the Dynamic Range of the processed image, you may adjust the Levels % control prior to selecting the input image. The Levels control specifies how much of the dynamic range found in the original files should be represented in the processed image. In order to make Landsat images appear natural-color, some of the original dynamic range needs to be discarded, allowing the spectral range normally perceived by the human eye to be expanded to fill the range of the processed image. The default value of 98% is usually a good starting point. Images with artificially bright areas (like clouds) may skew the results, requiring a smaller Levels value (try 95%).
Starting in PixelSense LS 1.10, you also have a new Advanced Options button. Clicking this button will open the Advanced Options window:
If you wish to alter the Dynamic Range of the processed image, you may adjust the Levels % control prior to selecting the input image. The Levels control specifies how much of the dynamic range found in the original files should be represented in the processed image. In order to make Landsat images appear natural-color, some of the original dynamic range needs to be discarded, allowing the spectral range normally perceived by the human eye to be expanded to fill the range of the processed image. The default value of 98% is usually a good starting point. Images with artificially bright areas (like clouds) may skew the results, requiring a smaller Levels value (try 95%).
Starting in PixelSense LS 1.10, you also have a new Advanced Options button. Clicking this button will open the Advanced Options window:
 In the Advanced Options window, you can choose HSV or Brovey Pan Merge options, or leave the default of no Pan Merge. Pan Merge is only available if you have the corresponding 15m panchromatic band file (usually has a name ending in _nn80.tif) present in the same directory as the other bands. HSV and Brovey merge are two methods of combining the low-resolution (30m) color information with the higher-resolution (15m) monochrome information from the panchromatic band. This increases the detail in the resulting color image, but typically alters the colors either brighter or darker. This has the result of skewing some colors to odd shades. For example, dark evergreen forests often show up much brighter in the Panchromatic band, because the Pan band captures some infrared wavelengths, where vegetation reflects strongly. As a result, a dark evergreen forest may end up a bright pistachio green after either Pan Merge technique. More info about this side-effect is available.
When you are satisfied with the Levels (and Advanced Options) settings, click on the Open File icon (image of a small yellow folder) in the upper right corner of the window. A File Dialog will appear to allow you to select an input file. You need only select the first of the three (or four, if utilizing the Pan band) files, the band 1 image, which has a name that resembles p189r34_5t19870604_nn1.tif. When you select this file, PixelSense LS will automatically locate the other input files if they are in the same directory, and begin processing.
In the Advanced Options window, you can choose HSV or Brovey Pan Merge options, or leave the default of no Pan Merge. Pan Merge is only available if you have the corresponding 15m panchromatic band file (usually has a name ending in _nn80.tif) present in the same directory as the other bands. HSV and Brovey merge are two methods of combining the low-resolution (30m) color information with the higher-resolution (15m) monochrome information from the panchromatic band. This increases the detail in the resulting color image, but typically alters the colors either brighter or darker. This has the result of skewing some colors to odd shades. For example, dark evergreen forests often show up much brighter in the Panchromatic band, because the Pan band captures some infrared wavelengths, where vegetation reflects strongly. As a result, a dark evergreen forest may end up a bright pistachio green after either Pan Merge technique. More info about this side-effect is available.
When you are satisfied with the Levels (and Advanced Options) settings, click on the Open File icon (image of a small yellow folder) in the upper right corner of the window. A File Dialog will appear to allow you to select an input file. You need only select the first of the three (or four, if utilizing the Pan band) files, the band 1 image, which has a name that resembles p189r34_5t19870604_nn1.tif. When you select this file, PixelSense LS will automatically locate the other input files if they are in the same directory, and begin processing.
 After a short time (less than one minute on modern computers, up to several minutes if utilizing Pan Merge) PixelSense LS will begin creating the finished image.
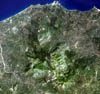
 Another short time later, PixelSense LS will finish its work, having created a new image in the same directory named something like p189r34_5t19870604_nnN.tif. The capital N in place of the band number signified that this is the Natural Color image. This image file will be large, often on the order of 200MB (or over 800MB if using Pan Merge).
 Command-line Options
Starting with version 1.15, PixelSense LS can now accept several command-line arguments to controls its operation, including setting the Levels, the Merge Mode and supplying one or more input filenames. As with the graphical user interface, only the band 1 (nn1) file must be specified, all other necessary files will be checked for and utilized automatically.
Command-line Options
Starting with version 1.15, PixelSense LS can now accept several command-line arguments to controls its operation, including setting the Levels, the Merge Mode and supplying one or more input filenames. As with the graphical user interface, only the band 1 (nn1) file must be specified, all other necessary files will be checked for and utilized automatically.
 Purchasing
Visit our Contact Us page to order a PixelSense LS license. We will e-mail you a small text file named registration.txt. Simply save this file in the same directory as your PixelSense.EXE, and PixelSense LS will become fully authorized to run without the demo limitations.
Purchasing
Visit our Contact Us page to order a PixelSense LS license. We will e-mail you a small text file named registration.txt. Simply save this file in the same directory as your PixelSense.EXE, and PixelSense LS will become fully authorized to run without the demo limitations.
p189r34_5t19870604_nn1.tif.gz
p189r34_5t19870604_nn2.tif.gz
p189r34_5t19870604_nn3.tif.gz
These comprise bands 1-3 (Blue, Green and Red respectively). At this time, the other files supplied by the GLCF are not necessary or useful to PixelSense LS. These files are supplied compressed in the GNU GZIP (.gz) format. Programs like 7-Zip (free) can be used to extract the .tif files from within their respective .gz files. You will need to extract the .tif files manually before running PixelSense LS.
When you have three files resembling these:
p189r34_5t19870604_nn1.tif
p189r34_5t19870604_nn2.tif
p189r34_5t19870604_nn3.tif
you are ready to run PixelSense LS to process them.
Running
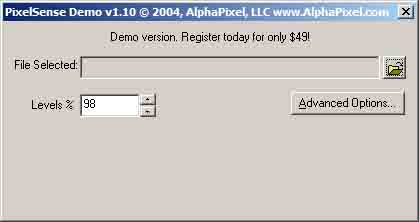
When PixelSense LS is launched, you will be presented with the main window.
If you wish to alter the Dynamic Range of the processed image, you may adjust the Levels % control prior to selecting the input image. The Levels control specifies how much of the dynamic range found in the original files should be represented in the processed image. In order to make Landsat images appear natural-color, some of the original dynamic range needs to be discarded, allowing the spectral range normally perceived by the human eye to be expanded to fill the range of the processed image. The default value of 98% is usually a good starting point. Images with artificially bright areas (like clouds) may skew the results, requiring a smaller Levels value (try 95%).
Starting in PixelSense LS 1.10, you also have a new Advanced Options button. Clicking this button will open the Advanced Options window:
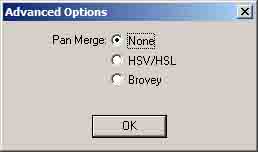
In the Advanced Options window, you can choose HSV or Brovey Pan Merge options, or leave the default of no Pan Merge. Pan Merge is only available if you have the corresponding 15m panchromatic band file (usually has a name ending in _nn80.tif) present in the same directory as the other bands. HSV and Brovey merge are two methods of combining the low-resolution (30m) color information with the higher-resolution (15m) monochrome information from the panchromatic band. This increases the detail in the resulting color image, but typically alters the colors either brighter or darker. This has the result of skewing some colors to odd shades. For example, dark evergreen forests often show up much brighter in the Panchromatic band, because the Pan band captures some infrared wavelengths, where vegetation reflects strongly. As a result, a dark evergreen forest may end up a bright pistachio green after either Pan Merge technique. More info about this side-effect is available.
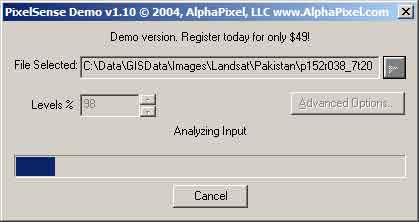
When you are satisfied with the Levels (and Advanced Options) settings, click on the Open File icon (image of a small yellow folder) in the upper right corner of the window. A File Dialog will appear to allow you to select an input file. You need only select the first of the three (or four, if utilizing the Pan band) files, the band 1 image, which has a name that resembles p189r34_5t19870604_nn1.tif. When you select this file, PixelSense LS will automatically locate the other input files if they are in the same directory, and begin processing.
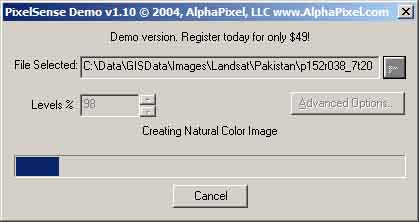
After a short time (less than one minute on modern computers, up to several minutes if utilizing Pan Merge) PixelSense LS will begin creating the finished image.
Another short time later, PixelSense LS will finish its work, having created a new image in the same directory named something like p189r34_5t19870604_nnN.tif. The capital N in place of the band number signified that this is the Natural Color image. This image file will be large, often on the order of 200MB (or over 800MB if using Pan Merge).
Command-line Options
Starting with version 1.15, PixelSense LS can now accept several command-line arguments to controls its operation, including setting the Levels, the Merge Mode and supplying one or more input filenames. As with the graphical user interface, only the band 1 (nn1) file must be specified, all other necessary files will be checked for and utilized automatically.
LEVELS=[number] (default=98)
MERGE=[none|hsv|brovey] (default=none)
p189r34_5t19870604_nn1.tif (default=none)
Example:
PixelSense.exe LEVELS=95 MERGE=HSV p189r34_5t19870604_nn1.tif p203r025_7t20000430_z30_nn10.tif p034r032_7t20010924_z13_nn10.tif
Command-line Wildcards
Starting with version 1.17, PixelSense LS can now accept wildcards in either/both the directory and filename portion of the file specification. This can be used to process entire directories of dozens, hundreds or even thousands of TIFF files at once. Multiple wildcards can be present in each command-line argument. Both the ‘*’ (0 or any number of characters) and ‘?’ (any single character) are accepted. Multiple wildcard-utilizing arguments can be provided at once.
Examples:
PixelSense C:\Landsat\Images\p*_nn1.tif
PixelSense C:\Landsat\Images\p0*r*_nn1.tif
PixelSense C:\Landsat\Images\p0*r03?_nn1.tif
PixelSense C:\Landsat\Images\p*_nn1.tif C:\Downloads\Landsat\p0*r03?_nn1.tif
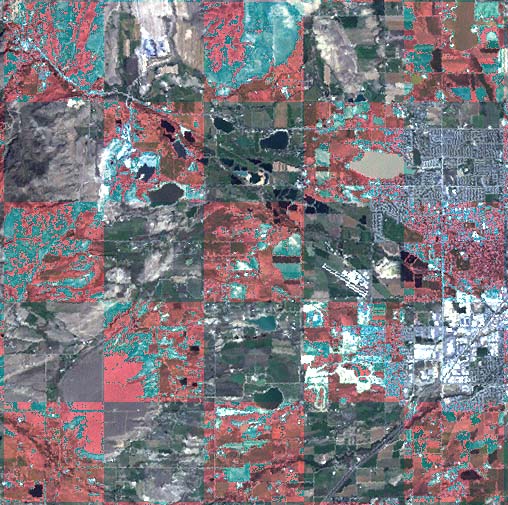
Demo Limitations
The unregistered Demo version does not have any time limitations, but all output natural Color images it creates are watermarked with a checkerboard pattern in the Red channel. Every alternating square of the checkboard will have correct coloration, the squares will be brighter Red.
Purchasing
Visit our Contact Us page to order a PixelSense LS license. We will e-mail you a small text file named registration.txt. Simply save this file in the same directory as your PixelSense.EXE, and PixelSense LS will become fully authorized to run without the demo limitations.
